You're reading an old version of this documentation. If you want up-to-date information, please have a look at stable (v1.6.1).
FileTree tutorial
Introduction
The goal of file-tree is to make it easier to define the input and output filenames of a data processing pipeline.
This tutorial shows the many features of filetree through simple pipeline examples.
For an overview of the main API see the FileTree docstring.
The goal of filetree is to define the directory structure for your input/output files separate from the actual pipeline code. The directory structure will be defined in a tree file (typically using “.tree” extension) using a format like:
paper_name = my-first-project, a-better-project, best-work-ever

papers
    references.bib
    {paper_name}
        manuscript.md
        {paper_name}.pdf (output)
Note that the text between curly brackets (e.g., “{paper_name}”) is a placeholder for which the possible values are given at the top.
Given such a filetree definition, we could write a pipeline like:
from file_tree import FileTree
from subprocess import run
tree = Filetree.read("<filename with filetree definition>")

for paper_tree in tree.iter("manuscript"):
    run([
        "pandoc",
        paper_tree.get("manuscript"), "-f", "markdown",
        "--bibliography", paper_tree.get("references"),
        "-t", "pdf", "-o", paper_tree.get("output"),
    ])
The pipeline above iterates over three papers (named “my-first-project”, “a-better-project”, and “best-work-ever”) and runs pandoc on each to convert the markdown manuscript to a pdf output. Here we assume all papers use a shared bibliography available as “papers/references.bib”. So before running the pipeline, the directory structure might look like this:
papers
├── a-better-project
│   └── manuscript.tex
├── best-work-ever
│   └── manuscript.tex
├── my-first-project
│   └── manuscript.tex
└── references.bib
Afterwards it will look like:
papers
├── a-better-project
│   ├── a-better-project.pdf
│   └── manuscript.tex
├── best-work-ever
│   ├── best-work-ever.pdf
│   └── manuscript.tex
├── my-first-project
│   ├── my-first-project.pdf
│   └── manuscript.tex
└── references.bib
One of the advantages of defining the input/output directories separate from the pipeline, is that it becomes much easier to change the input/output filenames. For example, if every manuscript has its own bibtex file rather than a single shared one, we could simply rewrite the filetree definition to:
paper_name = my-first-project, a-better-project, best-work-ever

papers
    {paper_name}
        manuscript.md
        references.bib
        {paper_name}.pdf (output)
The same pipeline code will work on this. The same code will even work if we have multiple versions for each paper:
paper_name = my-first-project, a-better-project, best-work-ever
version = first, final, real-final, after-feedback, final-final, last

papers
    {paper_name}
        version-{version}
            manuscript.md
            references.bib
            {paper_name}.pdf (output)
This latter code will iterate through all possible permutations of “paper_name” and “version” (i.e., 3 paper names x 6 versions = 18 runs). Note that here the pipeline code will fail if we don’t have the exact same versions for each paper. We will see ways to deal with that below.
In this tutorial we will go through the individual steps in defining a pipeline like this.
Note
To make it easier to copy/paste the code examples we will define the filetrees as strings in this tutorial, which can be read using FileTree.from_string.
In practice, I recommend storing the FileTree definition in a separate file, which can be loaded using FileTree.read.
FileTree interactivity
There are several tools available to explore the output after running the pipeline or when analysing someone else’s output. Given a text file describing the directory structure one can run from the command line:
file-tree <tree_file> -d <top_level_directory>
Note
This feature requires textual <https://github.com/Textualize/textual> to be installed. You can get this using pip/conda install textual.
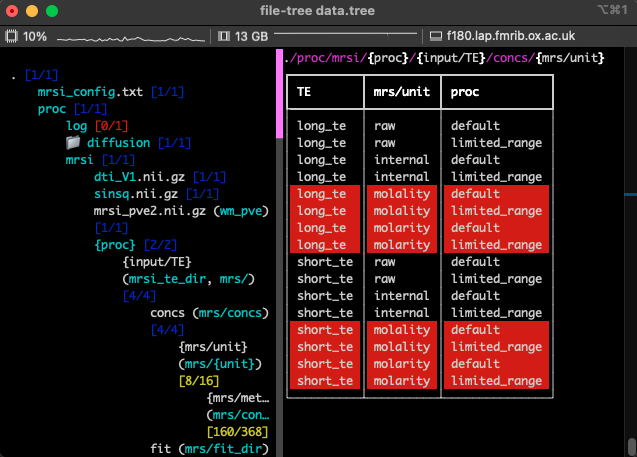
This will open an interactive terminal-based app illustrating the FileTree and which of the files defined in the FileTree actually exist on disk.
Within python this same app can be accessed by running FileTree.run_app:
from file_tree import FileTree
tree = Filetree.read(<filename with filetree definition>).run_app()
Because this app runs fully within the terminal, it will still run when connected to a remote machine.
For neuroimaging applications the FileTree can also be used to visualise any images in the pipeline using FSLeyes.
FileTree indendation
The FileTrees are defined in a simple to type format, where indendation is used to indicate subdirectories, for example:
# Any text following a #-character can be used for comments
parent
    file1.txt
    child
        file2
    file3.txt
file4.txt
In the top-level directory this represents one file (“file4.txt”) and one directory (“parent”). The directory contains two files (“file1.txt” and “file3.txt”) and one directory (“child”) which contains a single file (“file2”). Hence, each line in this file corresponds to a different path. We refer to each such path as a template.
Individual aspects of this format are defined in more detail below.
Template keys
Each template (i.e., directory and file path) in the FileTree is assigned a key for convenient access. For example, for the FileTree above, we can access the individual path templates using:
from file_tree import FileTree
tree = FileTree.from_string("""
parent
    file1.txt
    child
        file2
    file3.txt
file4.txt
"""
)
print(tree.get('file2'))
# 'parent/child/file2'
print(tree.get('child'))
# 'parent/child'
These filenames will be returned whether the underlying file exists or not (see FileTree.get).
By default the key will be the name of the file or directory without extension (i.e., everything the first dot).
The key can be explicitly set by including it in round brackets behind the filename,
so left_hippocampus_segment_from_first.nii.gz (Lhipp) will have the key “Lhipp”
rather than “left_hippocampus_segment_from_first”.
Matching the keys between the filetree definitions and the pipeline code is crucial to prevent bugs.
Note
Having the same key refer to multiple templates will lead to an error while reading in the filetree definition. Usually, this error arises because you have multiple directories/files with identical names (e.g., “data”) in multiple locations. You can fix this by giving these directories/files a custom key using the round brackets.
Placeholders
FileTrees can have placeholders for variables such as the paper name or version in the example above. Any part of the directory or file names contained within curly brackets will have to be filled when getting the path:
from file_tree import FileTree
tree = FileTree.from_string("""
{paper_name}
    references.bib
    manuscript_V{version}.md (manuscript)
""")
tree.get('references')
# ValueError raised, because paper_name is undefined
paper_tree = tree.update(paper_name="my-paper")
print(paper_tree.get('references'))
# 'my-paper/references.bib'
print(paper_tree.get('manuscript'))
# ValueError raised, because version is undefined
print(paper_tree.update(version="0.1").get('manuscript'))
# 'my-paper/manuscript_V0.1.md'
Placeholders can be undefined, have a single value or have a sequence of possible values. The latter can be used for iteration over those values.
Placeholder types
Filling in placeholder values uses python formatting under the hood. This means that the full Python format string syntax) can be used. For example, the following expects the version to be an integer:
from file_tree import FileTree
tree = FileTree.from_string("""
{paper_name}
    references.bib
    manuscript_V{version:02d}.md (manuscript)
""", paper_name="my-paper")
print(tree.update(version=2).get("manuscript"))
# 'my-paper/manuscript_V02.md'
print(tree.update(version='3').get("manuscript"))
# 'my-paper/manuscript_V03.md'
print(tree.update(version='alpha').get("manuscript"))
# raises an error, because the version can not be converted to a string
Note that the placeholder formatting is slightly more forgiving than the python string formatting. In this case, “version” does not need to be an integer, it only needs to be convertable into an integer.
Placeholder iteration
In pipelines you will typically want to iterate over multiple parameter values. We used this in the initial code example to iterate over all manuscripts (and optionally over their multiple versions):
for paper_tree in tree.iter("manuscript"):
run([
    "pandoc",
    paper_tree.get("manuscript"), "-f", "markdown",
    "--bibliography", paper_tree.get("references"),
    "-t", "pdf", "-o", paper_tree.get("output"),
])
There are two methods for this in FileTree, namely FileTree.iter and FileTree.iter_vars
The former expects a template key and iterates over all placeholders in that template that have multiple possisble values.
For the latter you need to explicitly provide the placeholder names you want to iterate over.
In either case, the iteration returns a series of FileTree objects with the same templates,
but different singular values for the placeholders you are iterating over.
There are a few more examples of this iteration in the section below.
If you want to see all possible values for a template without iterating over it,
you can use FileTree.get_mult.
Setting placeholder values
There are five ways to define placeholder values:
Within the filetree definition. Multiple values are separated by comma’s. The following example shows how to set a single value (for paper_name) or multiple values (for version) within the filetree definition:
paper_name = my-paper
version = alpha, beta
When loading the FileTree definition you can set any placeholder values directly in the constructor (overriding any in the filetree definition):
from file_tree import FileTree
tree = FileTree.from_string("""
    paper_name = my-paper
    version = alpha, beta
""", paper_name='other_paper')
print(tree.placeholders['paper_name'])
# 'other_paper'
The example above also shows you can access the placeholders attribute directly, which can be used to update its values (e.g., tree.placeholders[‘paper_name’] = ‘new_value’).
FileTree.updatecan be used to update the placeholder values inplace or return a new filetree with the updated values.
FileTree.update_globcan be used to identify all possible placeholder values based on which input files already exist on disk. For example, the following iterates over all “papers/*/manuscript.md” files on disk and produces the corresponding output pdf:from file_tree import FileTree from subprocess import run tree = FileTree.from_string(""" papers {paper_name} manuscript.md {paper_name}.pdf (output) """) for paper_tree in tree.update_glob("manuscript").iter("manuscript"): run([ "pandoc", paper_tree.get("manuscript"), "-f", "markdown", "-t", "pdf", "-o", paper_tree.get("output"), ])This also works for multiple placeholders. In the following we iterate over all permutations of paper_name and version:
from file_tree import FileTree
from subprocess import run
tree = FileTree.from_string("""
papers
    {paper_name}
        V-{version:d}
            manuscript.md
            {paper_name}.pdf (output)
""")
for paper_tree in tree.update_glob("manuscript").iter("manuscript"):
    if not paper_tree.get("manuscript").exists():
        continue
    run([
        "pandoc",
        paper_tree.get("manuscript"), "-f", "markdown",
        "-t", "pdf", "-o", paper_tree.get("output"),
    ])
The type formatting for “version” will ensure that it will only match integers, so “papers/my-paper/V-alpha/manuscript.md” is not a match, but “papers/other-work/V-80/manuscript.md” is.
Note
Here we added a check inside the iteration to see whether the manuscript file actually exists. The reason for this check is that the iteration is actually a two step process, which can lead to invalid permutations of “paper_name” and “version”:
First in tree.update_glob(“manuscript”)… we identify all possible values for “paper_name” and “version” that have a valid “manuscript.md”.
Then, in …iter(“manuscript”) we iterate over all possible permutations for “paper_name” and “version”. If we don’t use the same version number for all manuscripts, this will lead to some invalid permutations as well.
Linked placholder values
Occasionally we might not want to iterate over all possible combination of values for some placeholders. For example, let us consider a case where we have two different bibliography files (one for marine biology and the other for history) and each paper only use one of these. We could enforce this using:
from file_tree import FileTree
tree = FileTree.from_string("""
{reference}.bib (reference)
{paper_name}
    manuscript.md
    {paper_name}.pdf (output)
""")
tree.placeholders[("paper_name", "reference")] = [("first-biology", "first-history", "another-biology"), ("marine-biology", "history", "marine-biology")]
for paper_tree in tree.iter("manuscript"):
    print(f"processing {paper_tree.get('manuscript')} with {paper_tree.get('reference')} into {paper_tree.get('output')}")
# processing first-biology/manuscript.md with marine-biology.bib into first-biology/first-biology.pdf
# processing first-history/manuscript.md with history.bib into first-history/first-history.pdf
# processing another-biology/manuscript.md with marine-biology.bib into another-biology/another-biology.pdf
Rather than running 3x2=6 combinations for all three papers and two reference files,
here we just iterate over three steps with the linked “paper_name” and “reference” values.
If you have already set the placeholder values you can use FileTree.placeholders.link or
FileTree.placeholders.unlink to link or unlink them.
Optional Placeholders
Normally having undefined placeholders will lead to an error being raised. This can be avoided by putting these placeholders in square brackets, indicating that they can simply be skipped if undefined. For example for the FileTree:
from file_tree import FileTree
tree = FileTree.from_string("""
{paper_name}
    [V-{version}]
        manuscript.tex
""", paper_name='my-paper')
tree.get('manuscript')
# 'my-paper/manuscript.tex'
tree.update(version='final').get('manuscript')
# 'my-paper/V-final/manuscript.tex'
Note that if any placeholder within the square brackets is undefined, any text within those square brackets is omitted.
An example with extensive use of optional placeholders can be found in the FileTree of the BIDS raw data format.
Sub-trees
FileTrees can include other FileTrees within their directory structure. This allows for the efficient reuse of existing trees.
For example, let’s consider we have already defined a tree like in a file called “child.tree”:
manuscript.tex
references.bib
{paper_name}.pdf (output_pdf)
We can then include these files as part of a larger directory structure like the following:
from file_tree import FileTree
tree = FileTree.from_string("""
versioned_papers
    {paper_name}
        V-{version}
            ->child (versioned)
unversioned_papers
    {paper_name}
        ->child (unversioned)
""", paper_name='my-paper', version='alpha')
tree.get("versioned/manuscript")
# 'versioned_papers/my-paper/V-alpha/manuscript.tex'
tree.get("unversioned/manuscript")
# 'unversioned_papers/my-paper/manuscript.tex'
Note that we mark where the sub-tree should be inserted using “->”.
The general format of this is:
-><tree name> [<placeholder in sub-tree>=<value>, ...] (<sub-tree precursor>)
In this example we use the precursor to distinguish between two different uses of the same sub-tree. We need to use this precursor to access the template keys (i.e., template key in the parent tree is “<precursor>/<template key in child>”). This precursor is optional. You can omit it if you want to use the same template key in the parent as in the child tree:
from file_tree import FileTree
tree = FileTree.from_string("""
versioned_papers
    {paper_name}
        V-{version}
            ->child
""", paper_name='my-paper', version='alpha')
tree.get("manuscript")
# 'versioned_papers/my-paper/V-alpha/manuscript.tex'
tree.get("output")
# 'versioned_papers/my-paper/V-alpha/my-paper.pdf'
Omitting a precursor for a child sub-tree can lead to conflicts between template keys in the parent and in the child.
Finally, you can set placeholder values just in the sub-trees.
The filenames defined in the sub-trees can be accessed using a “/” in the key:
from file_tree import FileTree
tree = FileTree.from_string("""
versioned_papers
    {paper_name}
        V-{version}
            ->child paper_name=output
""", paper_name='my-paper', version='alpha')
tree.get("output")
# 'versioned_papers/my-paper/V-alpha/output.pdf'
Setting sub-tree placeholder values in this way will not affect the placeholder values in the rest of the tree. So, in this example, the “paper_name” in “{paper_name}.pdf” is set to “output”, but the directory is still called “my-paper”. This is also true for any placeholder values defined in the child FileTree definition.
Including external files
Sometimes you want to include templates that are not part of the structure directory. They might be absolute paths or relative to the current working directory. You can include these files in the FileTree definition by preprending them with a bang:
papers
    {paper_name}
        manuscript.md
        {paper_name}.pdf (output)

!~/bib
        references.bib
In this example, we use a global set of references stored in “~/bib/references.bib” rather than store the bibliography as part of the papers directory.
Updating templates
When the input/output filenames will have to be provided by the user of the pipeline, they cannot be defined beforehand in a FileTree definition. There are several ways to support this:
If the user provides the top-level directory, but the structure within is defined by your filetree definition, you can pass on this top-level directory name as the “top_level” keyword during the FileTree construction. The whole FileTree will be relative to this “top-level” directory (which defaults to the current directory).
If the user provides a single input file/template you can add this to an existing filetree using
add_template. By default this new template will be relative to the “top-level” directory. To make it relative to the working directory set “parent_template” to None. The add_template method can overwrite existing templates, which can be useful when you have a default path for an input/output file, which might be overwritten by the user.If the user provides a directory name, which itself contains a structured directory, you have two choices. You can include a version of that directory in your FileTree definition and then overwrite the directory containing that part of the tree using add_template. This will automatically redefine all the templates contained within that directory. Alternatively, you can define the structure within the user-provided directory as a separate tree and add it to your FileTree using
add_subtree.
Writing filetrees
You can export the filetree to a string representation of the filetree or write it to disk.
This can be done using to_string or write.
The resulting string is a fully valid filetree definition, which will contain all the templates and placeholder values (including linkages). Hence it can be used for exporting a filetree and reading it into a different python process or for introspection of the current filetree state.
Example neuroimaging pipeline
Here we will look at a simple example pipeline based on processing neuroimaging data using FSL (https://fsl.fmrib.ox.ac.uk/fsl/fslwiki).
A very simple pipeline to run brain extraction using FSL’s BET on every subject can start with a FileTree like
{subject}
    T1w.nii.gz
    T1w_brain.nii.gz (bet_output)
    T1w_brain_mask.nii.gz (bet_mask)
Assuming that the input T1w’s already exist, we can then simply run BET for every subject using:
from fsl.utils.filetree import FileTree
from fsl.wrappers.bet import bet
tree = FileTree.read(<tree filename>)

tree.update_glob("T1w", inplace=True)  # sets subject IDs based on looking for any valid "T1w" images.

# Iterates over set of placeholders that correspond to each T1-weighted image file matching the template
for T1w_tree in tree.iter('T1w'):
    # get retrieves the filenames based on the current set of placeholders
    # make_dir=True ensures that the output directory containing the "bet_output" actually exists
    bet(input=T1w_tree.get('T1w'), output=T1w_tree.get('bet_output', make_dir=True), mask=True)
Changing directory structure
If later on in our input files change, because for some subjects we added a second session, we could keep our script and simply update the FileTree:
{subject}
    [ses-{session}]
        T1w.nii.gz
        T1w_brain.nii.gz (bet_output)
        T1w_brain_mask.nii.gz (bet_mask)
Note the square brackets around the session sub-directory. This indicates that this sub-directory is optional and will only be present if the “session” placeholder is defined (see Optional Placeholders).
This means that with the script run with this updated tree will run bet on each T1-weighted image even for a directory structure like:
subjectA/
    T1w.nii.gz
subjectB/
    ses-01/
        T1w.nii.gz
    ses-02/
        T1w.nii.gz
If we get told off that our script is writing the output to the same directory as our input data, altering this behaviour is again as simple as altering the FileTree to something like:
raw_data
    {subject} (input_subject_dir)
        [ses-{session}] (input_session_dir)
            T1w.nii.gz
processed_data
    {subject} (output_subject_dir)
        [ses-{session}] (output_session_dir)
            bet
                {subject}[_{session}]_T1w_brain.nii.gz (bet_output)
                {subject}[_{session}]_T1w_brain_mask.nii.gz (bet_mask)
Note that we also encoded the subject and session ID in the output filename. We also have to explicitly assign keys to the subject and session directories, even though we don’t explicitly reference these in the script. The reason for this is that each directory and filename template must have a unique key and in this case the default keys (respectively, “{subject}” and “[ses-{session}]”) would not have been unique.
Output “basenames”
Some tools like FSL’s FAST produce many output files. Rather than entering all of these files in our FileTree by hand you can include them all at once by including Sub-trees (this example requires installation of the FSL FileTrees using pip install file-tree-fsl):
raw_data
    {subject} (input_subject_dir)
        [ses-{session}] (input_session_dir)
            T1w.nii.gz
processed_data
    {subject} (output_subject_dir)
        [ses-{session}] (output_session_dir)
            bet
                {subject}[_{session}]_T1w_brain.nii.gz (bet_output)
                {subject}[_{session}]_T1w_brain_mask.nii.gz (bet_mask)
            fast
                ->fast basename={subject}[_{session}] (segment)
Here we chose to set the “basename” of the FAST output to a combination of the subject and if available session ID.
Within the script we can generate the fast output by running
from fsl.wrappers.fast import fast
fast(imgs=[T1w_tree.get('T1w')], out=T1w_tree.get('segment/basename'))
The output files will be available as T1w_tree.get(‘segment/<placeholder name>’), where <placeholder name> is one of the short placeholder names defined in the FAST FileTree.